trainingtutorial:tmp:documentor_tour
Table of Contents
Documentor Tour
A brief description of the main windows in Documentor are given here. For more details please see the product documentation in the “Documentor Reference” section available from the first overview page.
Hierarchy Diagram and Left Hand Panel
Open Documentor and you will see the hierarchy view of the model something like the following image.
- The hierarchy diagram on the right includes a root node (grey circle with text: Tutorial 1) and calculator nodes (yellow boxes, for example: Population). The idea is to organize the model here in terms of the logical components and groupings.
- * Double click on any yellow calculator box to move to it's calculator diagram described in the next major section below.
- On the left is a panel with several tabs at the bottom.
- * The default one is “Hierarchy” and is a tree view of the diagram hierarchy diagram.
- * The next tab is the “Informants” tab. It lists all the informants defined for the model and is where new informants can be added
- * The next tab is the “Measures” tab. It lists all the entities and scientific units defined for the model and is where new measures can be added
- * The last tab is the “Variables” tab. It lists all the variables in the model and is a good way to find where a variable is used. Right click on it and choose “Calculators” to find which calculators use this variable.
Calculator Diagram
Double clicking on any yellow box in the Hierarchy Diagram opens the associated calculator diagram something like the following image. More details follow.
Elements of a calculator diagram include:
- Stock Variables - These are variables containing counts of some item usually. For example:
- Flow Variables - These are variables containing counts of something that happen per time period or other flow situations. For example:
- Parameter Variables - These are all other variables, rates, shares, constants etc. For example:
- Procedure boxes - These boxes contain all the TOOL code to do the math with the variables. Double click on one to see the code. For example:
- Links Internal to model - references variables calculated in other calculators - Yellow box with solid boarder, for example:
- Links to shared inputs to the model - references to variables that will be filled from sources external to the model and are referenced by multiple calculators. For example:
- Links Internal to a calculator - references variables that exist multiple times within the same calculator appear as above but with white boxes instead of yellow
Procedure Editor Dialogue
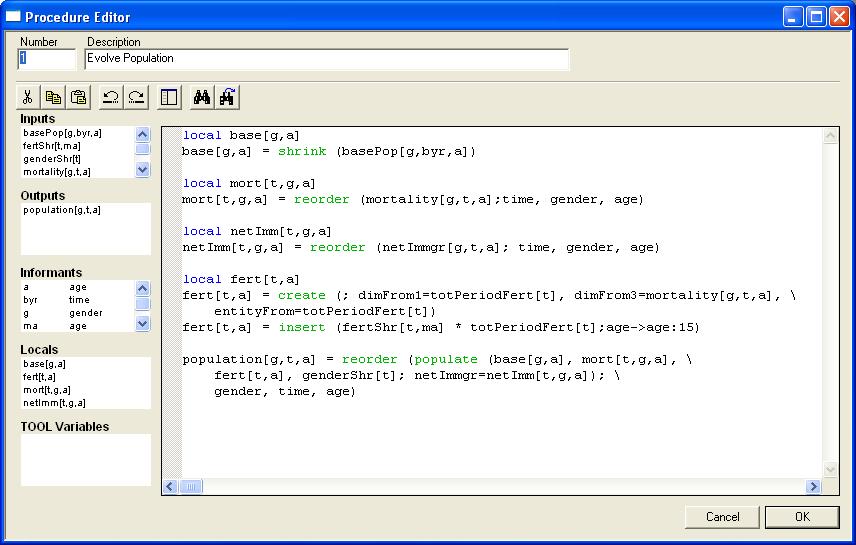
Double clicking on a procedure box within a calculator diagram will open the procedure editor dialogue.
Parts of the window
- Number - reflected out in the diagram in indicates the run order within the calculator
- Description - reflected out in the diagram inside the box
- Code Window - is the large window on the right part of the page
- * Tool names appear in green in this window
- * Keywords (e.g. local, if, endif) appear in blue.
- * Comment lines beginning with “!” are red
- Left hand panels - on opening the Procedure Editor dialogue, the variable information windows will be populated as follows:
- * Inputs Window - all input objects connected to this procedure
- * Outputs Window - all output objects connected to this procedure
- * Informants Window - the index and names of all informants used by all objects in the procedure
- * Local Window - all objects declared as local objects in the existing code
- * TOOL Variables Window - all TOOL variables declared in the current code of this procedure
Features:
- Double click on an entry in any left hand panel will insert that string into the code window. This prevents ever having to type names twice thus reducing the coding error rate.
- Hold the <Ctrl> key and double click on an entry in the inputs, outputs or informants left hand panel opens the properties dialog for that element.
- Right click on an entry in the informants left hand panel brings up a popup menus and if you choose “Copy Elements” the elements of the informant are put in the clip buffer and can be pasted wherever.
trainingtutorial/tmp/documentor_tour.txt · Last modified: 2009/09/23 14:18 (external edit)


